Kodak Anastigmat 152mm f/6.3 (1920's)
Folding cameras were very popular before World War II.
Almost all important camera makers produced cameras of this type,
and most of them used larger size films.
After World War II, cameras using the Kodak 135 (or 35mm) film became more popular,
and, as a result, folding cameras that accepted 135 film appeared
(e.g., Zeiss Ikon Contessa 35).
However, they were replaced quickly by rangefinder cameras and then SLRs.
Because most of these larger format folding cameras are very cheap nowadays,
it would be very interesting to see how their old lenses perform
on a modern digital body.
As long as a lens is in good condition and its T shutter is working,
it is likely we have a chance to use it in some way.
A lens of this type uses a bellows on a camera body for focusing,
and we need a modern bellows.
A bellows has some thickness.
Coupled with the use of conversion rings plus the camera body depth,
the total thickness could already be 50mm or even 60mm.
If the adapting procedure is a bit more complex, 70mm or larger is likely.
My point is:
As we all know, the shortest focus distance occurs when a lens focuses to infinity,
and the distance from the lens to camera sensor is approximately the focal length.
Therefore, if an old lens can be mounted on a modern bellows and be able to focus to infinity,
the total length from the lens (or from the rear of the lens)
to the camera sensor must be larger than 60mm or even 70mm.
In some cases, even a 75mm lens is insufficient,
and, hence, lenses with focal length longer than 100mm are preferable.
Most of these folding cameras use the 120 film or larger,
and the normal/standard lenses have a focal length of 105mm or longer.
This means normal/standard lenses on larger format folding cameras are good candidates.
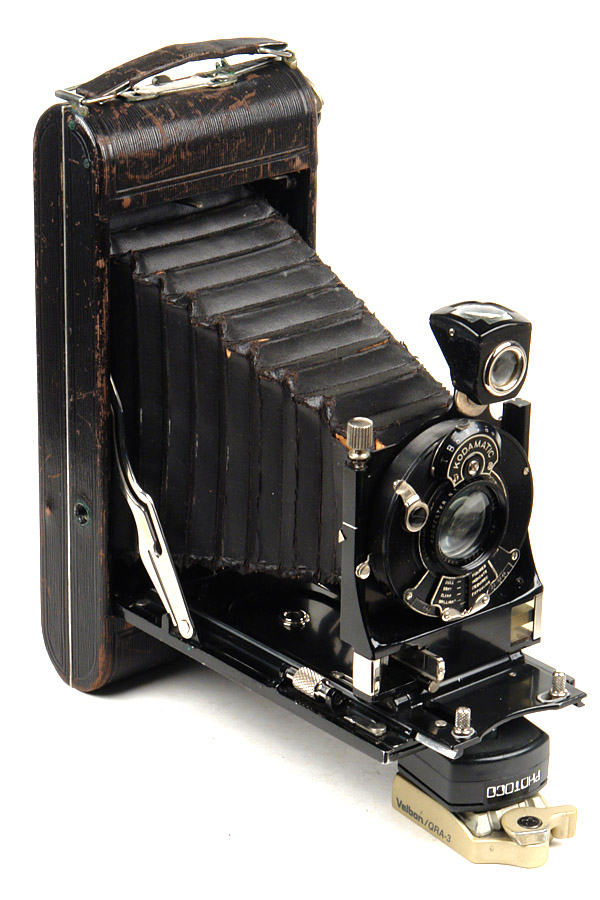
Use the latch underneath the handle (below left) to open the back cover. This reveals the film chamber and the back of the lens (below right).

The lens is fixed by a retaining ring (below left). Use some tool to unscrew the retaining ring and the lens will fall off from the front of the camera. The right image below shows the film chamber after the lens is taken off.

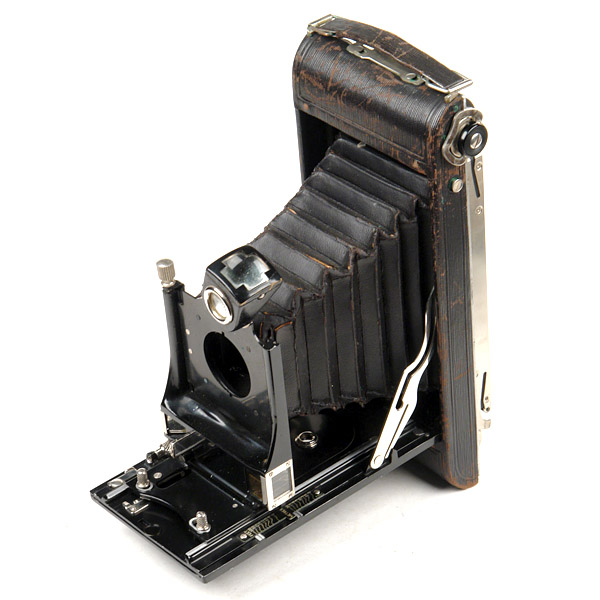
The following image shows the camera without its lens.
The following shows the back of the lens and its retaining ring:


Along the lower edge of the lens is a slider for aperture control. We see four markings (DULL, GRAY, CLEAR and BRILLIANT). When the arrow head on the slider points at an aperture value (f/11 in the image), the numbers in the opening (i.e., 5, 10, 25, 50) are the corresponding shutter speeds on a dull day, gray day, clear day and brilliant day. The aperture range is from f/6.3 to f/45 as shown in the image above.
The top part of the lens marked with KODAKMATIC is the place for selecting shutter speed. This lens uses the so-called KODAKMATIC between-the-lens shutter and the available shutter speeds are 5, 10, 25, 50, 100, 150, B and T (below left). It is unlikely that the shutter speeds would be correct after decades of use. However, we only use the T setting. There is a shutter release connector in the middle on the right side of the lens (below right).

Facing the lens, the left side next to the marking EASTMAN KODAK CO. has a lever for cocking the shutter. When the shutter is not cocked, the lever points to the 11 o'clock position. See the front view image of the lens. To cock the shutter, push this lever all the way down so that it points to the 7 o'clock position (below left).

The small lever on the left edge of the lens is the shutter release lever. When using the B shutter, push the shutter release lever all the way down and keep it there. Then, the shutter cocking lever goes up to the 9 o'clock position (above right). In this way, the lens aperture opens to the indicated size. Releasing the shutter release lever closes the aperture and the shutter cocking lever returns to the 11 o'clock position. When using the T shutter, just push the shutter release lever all the way down and release it. Then, the aperture opens. Pushing the shutter release lever again closes the aperture and an exposure completes. Because the lens is mounted on a digital body, we use the shutter in the camera body for exposure and, hence, using the T shutter is better than the B shutter as we could leave the aperture always open. This means that we just cock the shutter and then push the shutter release lever all the way down. Then, the aperture is open forever!

First, insert the rear end of the lens into the inner opening of the 37-52mm step-up ring so that the 52mm female thread is available (below left). Then, put the retaining ring back and fasten it so that the 37-52mm step-up ring will not wiggle as shown in the right image below. Now we have a 52mm female thread!

Screw the 52mm male thread of the Nikon BR2 into the 52mm female thread and we have a Nikon F mount lens!

Finally, mounting this combo to Nikon PB6 and adding a Nikon to Sony NEX adapter, we are able to use this old lens on a Sony NEX5 body.
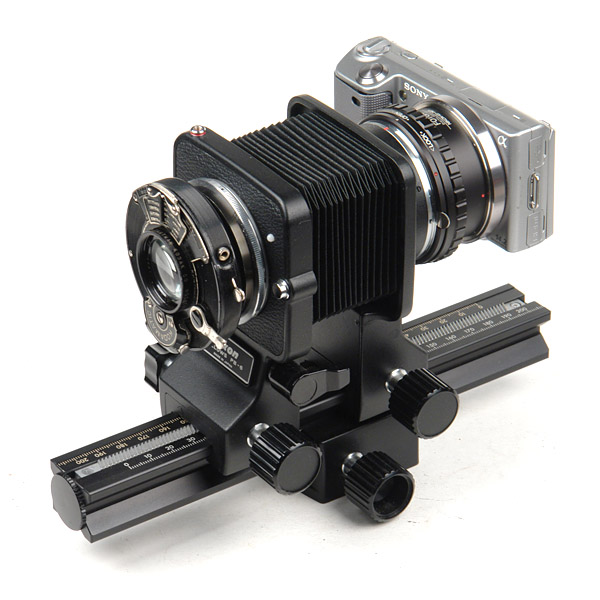
Why a Sony NEX5 rather than a Nikon DSLR? Good question! The maximum aperture of this lens is f/6.3, which is smaller than the typical smallest aperture required for focus confirmation (i.e., f/5.6), making focusing more difficult. Worse, as the bellows extends for focusing, there could be a significant light loss. As a result, a MILC (Mirrorless Interchangeable Lens Camera) with the peaking capability would be more convenient than a typical DSLR. Additionally, as long as you can find an adapter that has a 52mm male thread and a mount for your bellows, you just follow the same procedure to mount this lens to your bellows. You do not have to use a 37-52mm step-up ring though. Any 37-XXmm step-up ring can be used as long as you can find an adapter with a XXmm male thread and a mount to your bellows. I picked Nikon because Nikon's accessories can easily be found.

I set the lens aperture at f/11 and use this aperture most of the time. Shutter is set to T as mentioned earlier. After the shutter is cocked, the shutter release lever is pushed all the way down, and, of course, the aperture is always open.


The first image below is a close-up shot. Again, the contrast is low. After converting to BW and adding a little contrast, we have the second, actually a better one.


The following is again a close-up. The scene contrast was a bit higher. The result still shows low contrast and consequently looks like a little over-exposed. The second image is a crop of the center part, which shows a rather decent resolution. The third one is obtained by converting the first one to BW with a little contrast adjustment, and the result becomes rather good.


I took the whole set out on a sunny day and had some shots. In general, I found that if the frame has a large portion of bright area, the obtained images would just like the following one in which a rather strong washed out effect can be seen. This could be the results of internal reflection within the lens, because lenses made in the 1920's were not coated. Adding a little contrast would usually yield good results.


The following image is our local Portage Lake Lift Bridge. Because illumination is rather even without extremely bright areas, the low contract effect is not very obvious. The contrast of this image is still lower than expected and color rendition is not very vivid but acceptable. The second image is the result of adding a little bit contrast, and the third one is obtained by converting the second to BW.


Then, I took the same scene with f/6.3 (largest), f/11 (median) and f/22. The following shows the crop of the center of each image. Obviously, resolution of this lens is not so great compared with modern lenses; but, it is not very poor either. The crops of f/11 and f/22 are better than that of the f/6.3, and the one taken with f/11 is the best because the f/22 result shows a loss of more contrast.

f/11

f/22

The following has the lower left crop of each image. This shows that the lens performed better at f/22 followed by f/11, and f/6.3 is the worst. Hence, off-center performance of this lens drops very quickly.

The image below has a Zeiss Ikon Icarette 500/2 folding camera. Although the lens shows Zeiss-Ikon, the original version of this camera was made by Ica from 1925, and its name is Icarette. See the top portion of the camera body. The camera was made around 1930 after Contessa-Nettel, Ernemann, Goerz and Ica merges into Zeiss Ikon in 1926. The image was taken at f/11. The sun light came from the upper left corner, causing flare in the lower portion of this image. The second image is obtained by converting the first one to BW and looks a little better.
![]()
The following is an indoor shot with low scene contrast. The lens performed well.

The following one was again taken in a low contrast scene, and the lens performed well.

Then, I took some flower shots on a sunny day with f/11. Color rendition on the second image is not vivid compared with the real one. However, increasing saturation a little bit would change the image significantly. The four image is the crop from the focus area of third one.


Finally, I took a few images of little things. The cat doll in the first image has a length of about 8cm, and the magnification is around 0.5X. The second one has a length of 35mm, and the magnification is around 0.45X. The third one has a length of 28mm, and the magnification is around 1:1!


Judged by these images, Kodak Anastigmat 152mm f/6.3 has a very decent performance at the center area compared with some modern lenses. Its resolution was reasonable; but, its problems are: lower contrast, not so vivid color rendition, and easy to flare.

Although bokeh is always associated with large aperture lenses, it may be interesting to see how this lens performs in this department. The next two images were shot at f/6.3, the largest aperture. The first image has a distant background, while the second has a rather close background. Each bright disc is a solid one without a bright edge and hallow interior. I believe this lens has a decent performance.


Well, would these "issues" be a big problem? It depends. To me, I have no problem at all because I got the camera cheap and could use it on a digital camera to see how people perhaps three generations older than us enjoyed the images taken by this lens. Redoing photo taking with a lens more than 80 years old is just an enjoyable experience.
Hope this article helps you. Happy shooting!
You are visitor
since December 3, 2015
Created: December 3, 2015
Last update: December 3, 2015