In the Automatic (A) mode, the sensor of an external flash takes over the control of flash exposure. In the Manual (M) mode, we return to the basics and do everything about flash exposure ourselves. More precisely, we choose an ISO speed and a lens aperture (resp., a flash-subject distance) and calculate the flash-subject distance (resp., lens aperture). The camera only triggers the flash, and when the flash fires, it always sends out its maximum power and won't cut off early. Therefore, if the aperture is too large or the flash-subject distance is too short, the image is likely to be over-exposed. On the other hand, if the aperture is too small or the flash-subject distance is too large, the image is likely to be under-exposed. Therefore, You'd better know what you are doing because you control the flash completely. A flash meter may be very helpful. Before we go on, please review the Automatic (A) mode first because these two modes are very similar and techniques for the Automatic (A) mode can also be applied to the Manual (M) mode.
The manual mode requires two user input: aperture and ISO sensitivity. This is exactly the same as the automatic mode. The ISO sensitivity is easy to understand because it is the ISO value used by the camera. The aperture is a little confusing to many beginners. In general, the aperture one must dial in to the flash is the aperture value used by the camera. However, we can use different apertures, and, as a result, it is important to understand the meaning of an aperture on a flash. An aperture, say Fx.y, on a flash means that the flash must send exactly the output power required to match the same aperture (and ISO) used on a camera. For example, if the camera and flash both use F8.0, the flash must prepare an illumination that can match F8.0. The power for F8.0 is twice the power of that for F5.6 because the opening for aperture F8.0 is 50% of the opening of the aperture F5.6, and to maintain the same amount of illumination the flash must send out twice the power of F5.6 for the F8.0. Therefore, a small aperture used on a flash causes the flash sends out more flash power, and the flash output for F8.0 is twice of the flash power of F5.6, which, in turn, has a output power twice of the F4.0. We shall use various sample shots to illustrate this fact. This seems similar to the discussion of the automatic mode. However, the key difference is that in the manual mode the flash always sends out the intensity for the given flash aperture, while in the automatic mode the flash output is the maximum available power as the flash sensor may cut off flash power early.
The Manual (M) mode is not very different from the Automatic (A) mode and is not very difficult to use, if you know the Automatic (A) mode well. It provides you with a total control of your flash and your camera. The following is a possible procedure of using and external flash that has an aperture setting.
Important Notes
Your external flash may not be powerful enough to illuminate the scene with a given aperture. Recall that the guide number of a flash is equal to the product of flash-subject distance and aperture. Therefore, if the selected aperture is small (resp., large), the flash-subject distance must be short (resp., long) to properly illuminate the scene. For example, suppose we use ISO 100 and a flash of GN 50. If we choose to use F8.0, the flash-subject distance should be less than or equal to 50/8 = 6.25 ft. If the flash-distance is larger than this value, the image will be under-exposed. Should this happen, use a larger aperture or move your flash closer to the subjects. Moreover, each external flash has its own minimum power output. If the flash-subject distance is too short, it is possible that the flash will not be able to reduce the power further to match the selected large aperture, then you will have an over-exposed image. Should this happens, use a smaller aperture and/or move away from your subject to increase the flash-subject distance. |
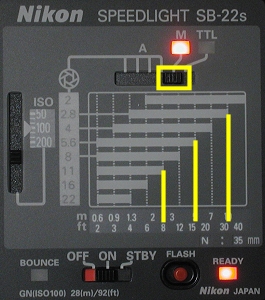
The following presents a number of examples that illustrate the use the back panels of a number of flashes. The first one is Nikon SB-22s. First, we need to set the switch to M. Second, use the slide to set an ISO speed. While the slide is moving, the aperture values will align with some horizontal scales which provide the desired flash-subject distances. In the following image, we see that apertures F2.8, F4.0, F5.6, F8.0 and F11.0 have flash-subject distances 30 ft, 20 ft, 15 ft, 12 ft and 8 ft, respectively. Thus, if we choose aperture F5.6, the flash should be placed at a distance of 15 ft from the subjects. On the other hand, if the flash-subject distance is 12 ft, then we should use aperture F8.0.
|
| Nikon 22s's back panel |
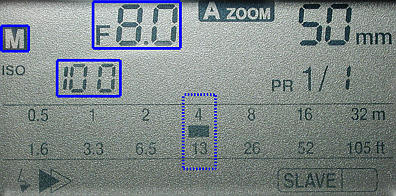
The following image is Sunpak PZ5000AF's back panel. It shows that the flash is in the M mode with ISO speed 100, focal length 50mm, aperture F8.0, and flash-subject distance 13 ft.
|
| Sunpak PZ5000 AF's back panel |
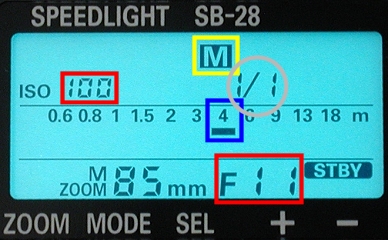
The following is the back panel of a Nikon SB-28. It shows that the flash is in the manual mode with ISO speed 100. The zoom is set to 85mm and aperture is F11. The flash-subject distance is 4m which is about 12 ft. When the flash is set to the M mode, make sure that the FP indicator below M disappears and that the power ratio is 1/1 as shown in the image below. Otherwise, you may not get the desired result.
|
| Nikon 28's back panel |
What if your flash does not have an aperture setting? Do not worry. Most flashes have a table like the one shown below. You simply choose an aperture (resp., flash-subject distance) and follow the horizontal (resp., vertical) line of the aperture (resp., flash-subject distance) until it intersects with the ISO speed diagonal line. The intersection point provides you with the desired flash-subject distance or aperture. The following is the table on the back panel of a Sunpak Digital Flash. The newer Sunpak DS 20 flash has the same table.

|
| Sunpak Digital Flash's back panel |
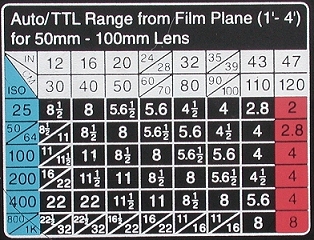
The following is another way of presenting the ISO, aperture and flash-subject distance information. Suppose the ISO speed is 100. The row of 100 shows the relationship between aperture and its corresponding flash-subject distance. For example, if the flash-subject distance is 16 (resp., 32) inches, check the intersection of the row of 100 and the column of 16 (resp., 32) and the corresponding aperture is F11.0 (resp., F5.6 1/2). On the other hand, if the aperture is known, we simply scan the row of 100 to locate the aperture value. The column that contains the aperture gives the corresponding flash-subject distance. For example, if the desired aperture is F8.0, the corresponding column heading shows 24/28 inches. This means that F8.0 would work fine with a flash-subject distance of 24-28 inches. Note that different flashes have different levels of output power, and, hence, their tables will also be different.
|
Most flash manufactures may exaggerate the GN a little. Therefore, after calculating the aperture from GN and flash-subject distance, don't hesitate to open up the aperture a little if you found your flash frequently gives you under-exposed results.
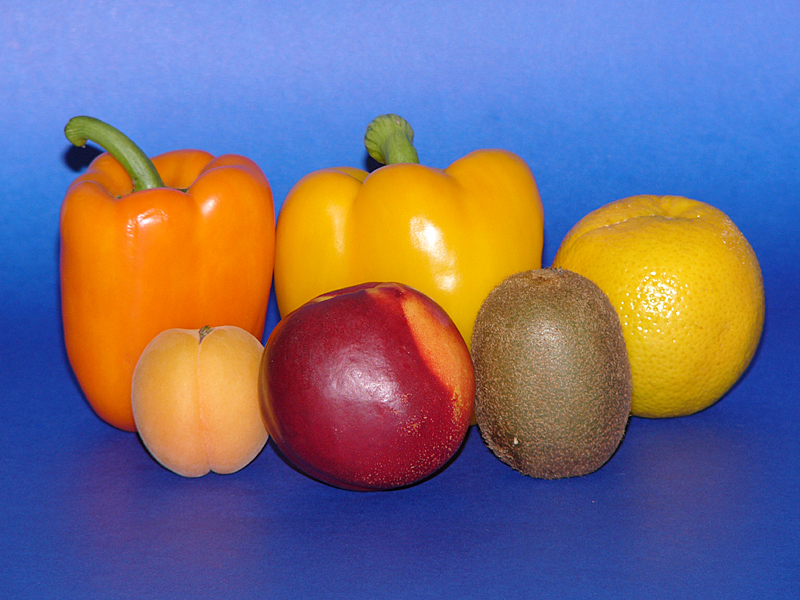
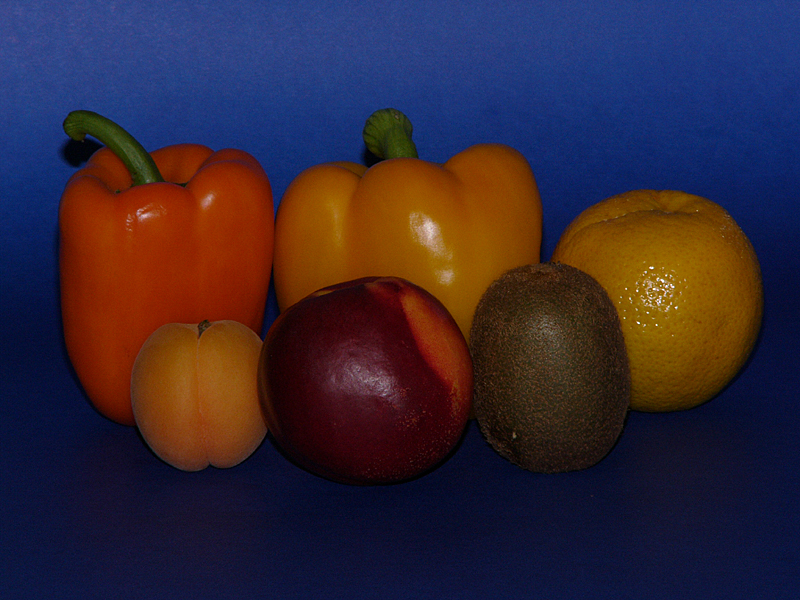
A Sunpak Digital Flash with a GN 52 (ft) or 16 (m) were used to take a number of sample shots. This is a very small and cheap flash that has a exposure table on its back panel as shown below.
The flash is mounted in a FZ-10 and the flash-subject distance is 6 feet. Since the GN at ISO 100 is 52, the lens aperture should be 52/6 = F8.7 to yield well-exposed results. If the ISO is set to 50, the lens aperture should be 1 stop larger (i.e., F6+) to compensate the slower ISO speed. The above table shows approximately the same results.
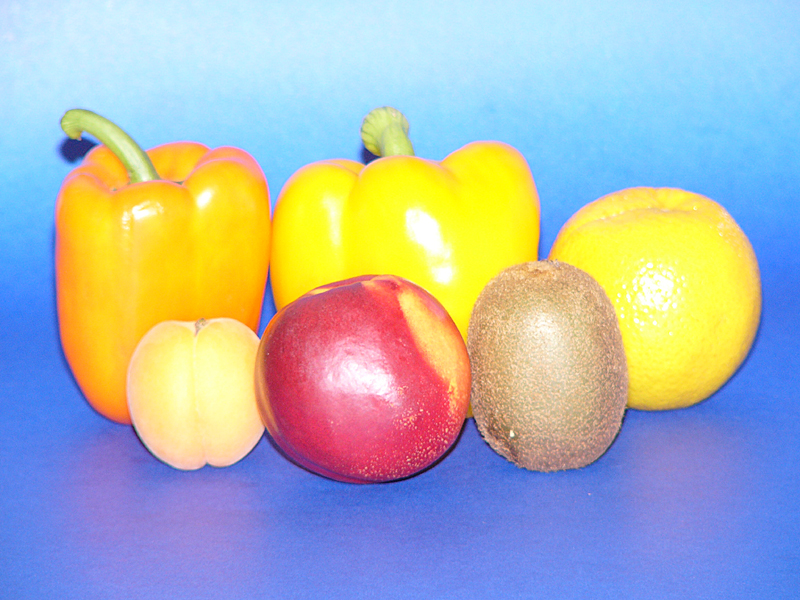
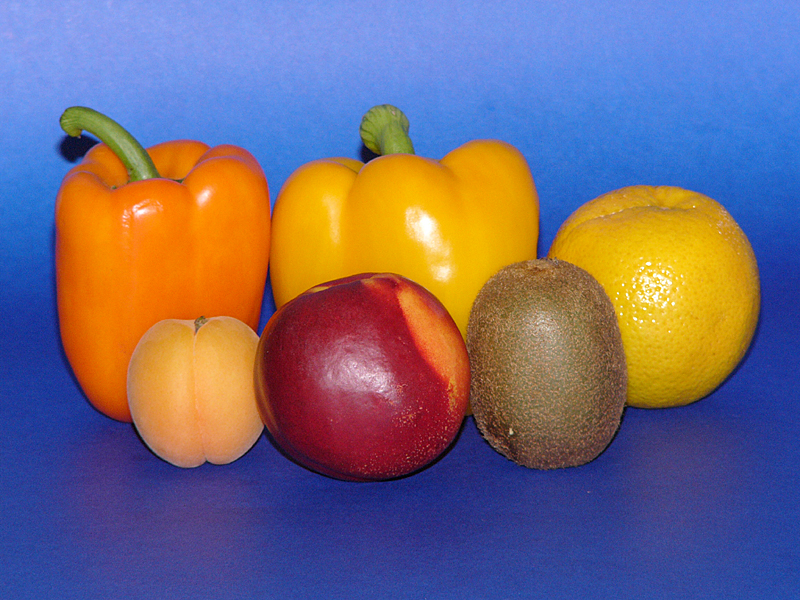
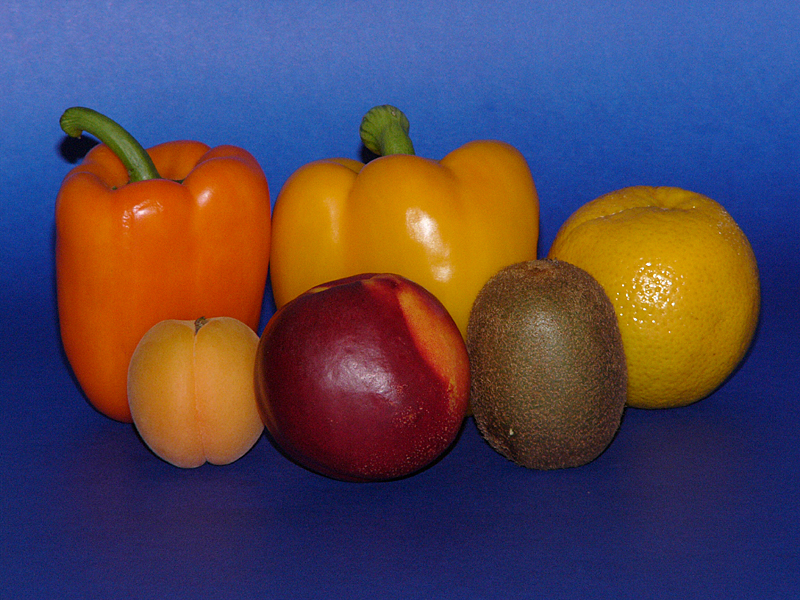
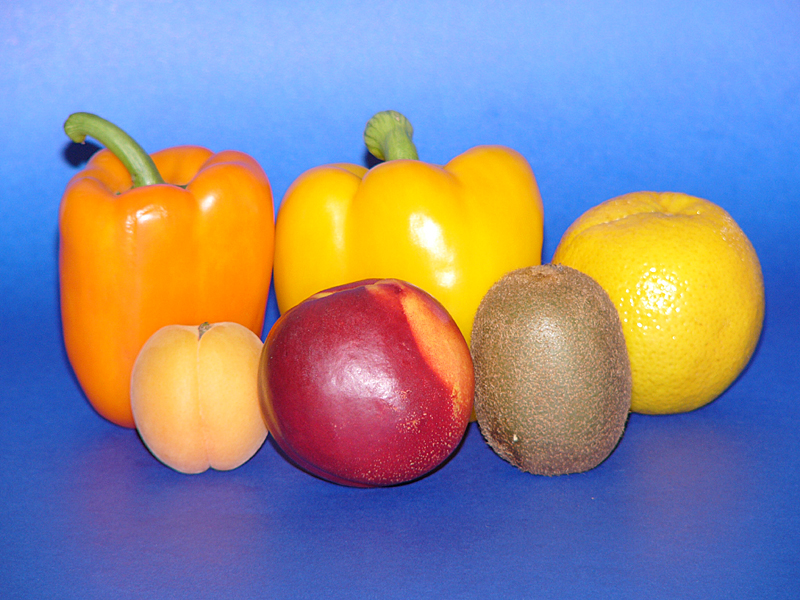
In the following, images on the first row were taken with ISO 100 and lens apertures F2.8, F4.0, F5.6 and F8.0, and the images on the second row used ISO 50. As you can see from the top row, F8.0 produces a slightly under-exposed result and the F5.6 version looks much better. The two with F4.0 and F2.8 were over-exposed. If we use ISO 50, since the flash output is constant (as the flash is in manual mode), reducing ISO speed by 50% means the lens must allow for 200% more light to pass through. Therefore, the results obtained with F4.0, F5.6 and F8.0 at ISO 100 will be similar to the results obtained with F2.8, F4.0 and F5.6 at ISO 50.
| |
F2.8 | F4.0 | F5.6 | F8.0 |
| ISO 100 |
|

|
|
|
| ISO 50 |
|
|

|
|
| Click on the image to view a larger one | ||||
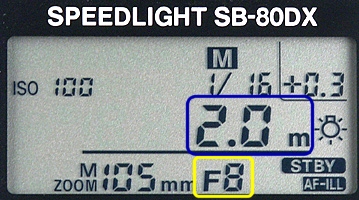
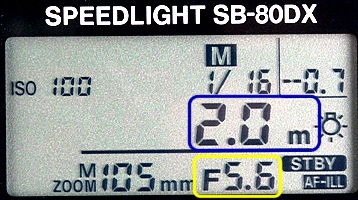
Some high end flashes provide very sophisticated mechanism to help users find usable apertures. The following images were taken with a Nikon SB80DX. One can select an aperture, say F8.0 (left image below), and then select the anticipated flash-subject distance. The flash itself can adjust its output power to match the selected aperture and its corresponding flash-subject distance. In the left image below, it shows at F8.0, flash-subject distance of 2 meters and focal length 105mm, the flash will put out its 1/16 full power with +0.3 stop compensation. If we change the aperture to F5.6 as shown in the right image below with everything kept the same, the flash will put out 1/16 of its power with -0.7 stop exposure compensation. The reason of having exposure compensation going from +0.3 stop to -0.7 stop, a 1 stop difference, is that the aperture being used F5.6 is 1 stop larger than the previous one F8.0. As you can see, a better flash can help us do a lot of tedious works.
|
|
| Nikon SB80DX back panel in manual mode | |
Important Notes
|