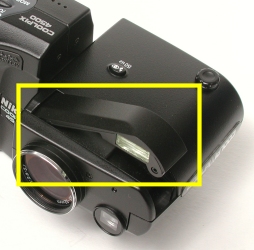
Nikon Coolpix 4500 has an internal flash, or Speedlight in Nikon's terminology, on the lens unit (left image below). This flash unit is folded down as shown. You must raise the internal flash to use it as shown in the right image below. This can be done in the automatic mode in which the camera raises the flash automatically when the scene is not illuminated sufficiently. Or, the internal flash can be raised manually when it is needed. Click here to learn how to do it.

|
|
| Slide the release lever to raise the flash | Flash in position |
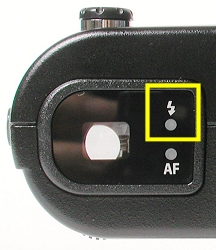
The Flash-Ready Indicator is the lamp in the back-side of the lens unit. See the image below. This indicator shows the status of the internal flash. When the shutter release button is pressed half-way down, this indicator may have one of the four situations as shown in the table below.
|
|
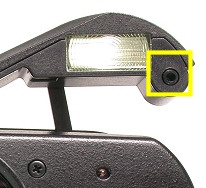
Coolpix 4500 has a flash sensor next to the internal flash (see the image below). When the shutter release button is pressed all the way down to take a photo, the camera instructs the internal flash to fire and uses the flash sensor to measure the illumination of the scene. Once the illumination is sufficient, the camera stops the flash firing and the exposure completes. However, due to the location of the flash sensor, it is not the so-called TTL (i.e., Through-The-Lens) flash measuring.
|
| Flash sensor |
With the TTL version, the flash sensor is behind the camera lens and sees what the lens sees. As a result, the measuring area is always identical to the area that will be recorded on the image. This relation does not change even though the on-camera lens is zoomed in and out, and in the close-up mode in which the camera is placed very close to the subject. With the 4500's way, the flash sensor sees an area that is different from what the camera lens sees. Consequently, flash intensity illumination may not be very accurate, especially when the subject is close to the camera. Additionally, due to the position of the internal flash, in close-up photography it may only illuminate a portion of the scene. In the following image, it is clear that the upper-left portion of the image is illuminated (by the internal flash) properly because that area is close to the internal flash. Hence, the illumination of the scene is un-even. Note that this is not a consequence of the non-TTL nature of the flash measuring. It is basically due to the flash position. In general photography, this non-TTL flash measuring works just fine. The only problem is that the non-TTL mode is not as accurate as the real TTL mode. So, there is nothing to worry about, and do not blow this deficiency out of proportion!

Flash Effective Distance and
Guide Number a.k.a. GN
No flash light can reach infinity. Moreover, a smaller (resp., larger) aperture requires more (resp., less) flash light to illuminate the scene properly. Additionally, if the lens is set to the wide angle side, the internal flash must cover a wider area, and, as a result, flash light cannot reach very far. On the other hand, if the lens is set to the telephoto side, the internal flash only covers a narrower area, and, of course, it can concentrate on this area and can reach farther. Consequently, the use of the internal flash involves three factors: the focal length, aperture, and maximum power of a flash. Given the flash power and a focal length, the range that a flash can illuminate properly is referred to as the Flash Effective Distance. Thus, any subject within this range will be illuminated properly using any available aperture on the camera lens.
To help you do flash photography, Nikon publishes the following data in the user guide of 4500. Thus, if the lens is zoomed to the wide angle end (resp., telephoto end), the internal flash can illuminate the area from 1'8" up to 5'3" (resp., 1'8" upto 9'10"). The distance between the subject and the flash is referred to as the flash-subject distance or subject-flash distance. Thus, we have that the flash-subject distance, when the lens is zoomed out to the wide angle end, must be between 1'8" and 5'3". Similarly, the flash-subject distance when the lens is zoomed in to the telephoto end must be between 1'8" and 9'10".
| Zoom Lens | Effective Distance |
| Wide Angle | 1'8" to 5'3" |
| Telephoto | 1'8" to 9'10" |
What if a subject is not within this range? If the flash-subject distance is shorter than the minimum one (i.e., 1'8"), the flash will not be able to reduce its power to properly illuminate the subject, and the subject will be over-exposed (i.e., too white or blown out). On the other hand, if the flash-subject distance is larger than the maximum, since the flash light will not reach that far, the subject will not receive sufficient flash light, and will be under-exposed (i.e., dark). Therefore, to use the internal flash properly, the main subjects must be kept within the indicated range.
When the camera is in the Programming (P) mode, Aperture-Priority (A) mode, Shutter-Priority (S) mode, or Manual-Exposure (M) mode, the internal flash can be in one of the following five flash modes:
| Option | Description | |
| Flash Mode | Icon | |
| Auto | No Icon | In the pop-up Auto mode, when the
scene illumination is insufficient, the camera will raise the
internal flash automatically when the shutter release button is
half-way pressed, and flash will fire when taking photos.
In the pop-up Manual mode, this option does not exist. In other words, you must raise the internal flash in order to use it. |
| Flash Cancel (off) | 
|
In the pop-up Auto mode, the camera
does not fire the internal flash even though the
illumination is insufficient.
In the pop-up Manual mode, the camera is in this mode when the internal flash is not raised. Once the internal flash is raised, the camera is in one of the other modes. Therefore, one can raise and fold the internal flash to control if it should fire. |
| Auto with Red-Eye Reduction | 
|
The flash is in the Auto mode and the Red-Eye Reduction feature is activated. Note that if the flash is in the pop-up Manual mode, it has to be raised before using this red-eye reduction mode. |
| Anytime Flash (Fill Flash) | 
|
The internal flash always fires when a photo is taken. Note that if the flash is in the pop-up Manual mode, it has to be raised before using this red-eye reduction mode. |
| Slow Sync | 
|
The flash is in the Auto mode and the Slow Sync feature is activated. In this mode, the flash fires with a slow shutter speed. Note that if the flash is in the pop-up Manual mode, it has to be raised before using this red-eye reduction mode. |
In the next few pages, Raise the Internal Flash covers the way of raising the internal flash; General Use discusses the general use of the internal flash; Red-Eye Reduction presents the cause and use of the Red-Eye Reduction mode; Slow Synchronization covers the concept and use of the Slow Synchronization mode; Variable Power discusses the way of increasing and reducing the output of the internal flash; and Turning the Internal Flash On and Off tells you how to turn on or off the internal flash. Finally, Does Shutter Speed Really Matter? demonstrates that you can use virtually all possible shutter speeds with the internal flash.
The internal flash is turned off automatically under the following conditions: