Under the manual exposure mode, you can set both aperture and shutter speed, and, therefore, you have complete control over the exposure system, including exposure compensation.
To enter the Aperture-Priority mode, press and hold the MODE button and at the same time turn the command dial:
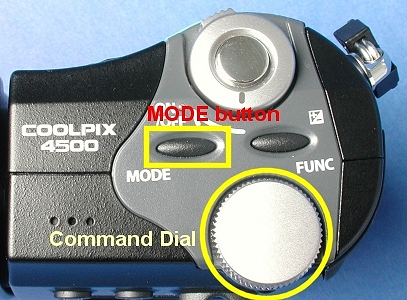
While the command dial is being turned, the letter in the lower-left corner of the LCD monitor changes. The possible letters are P, A, S and M for the program, aperture-priority, shutter-priority and manual exposure modes, respectively. Therefore, once M is shown on the monitor (see the next section), the camera is in the manual-exposure mode and you can release the MODE button.
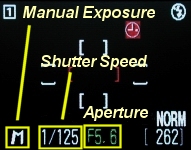
When the camera is in the manual exposure mode, you can change either aperture or shutter speed, or both. Once the camera is in the manual exposure mode, the current aperture and shutter speed are shown on the monitor. See the image below. However, the camera only permits a user to change aperture and shutter speed one at a time. The one can be changed is shown in green. In the image below the aperture F5.6 is shown in green, which is the one can be changed. You can press the MODE button to switch between aperture and shutter. For example, with the screen below, pressing the MODE button will cause the shutter speed to be shown in green. Then, it can be replaced with a shutter speed.
The following is the procedure for changing aperture or shutter speed:
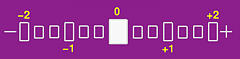
While you can select any combination of (aperture, shutter speed) and take a shot, the selected (aperture, shutter speed) may not provide a good result as far as correct exposure is the major concern. Therefore, the exposure system provides you with some aids. The first aid is a scale on the monitor as shown below. When you turn the command dial, this scale appears. In the middle of this scale is a white rectangle showing the position of a "correct" exposure suggested by the camera. Each small rectangle to the right (resp., left) indicates a 1/3 stop increment (resp., decrement). Thus, if some rectangle to the right (resp., left) of the white one become white, it means the current selection of (aperture, shutter speed) combination causes over- (resp., under-) exposure.
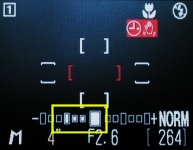
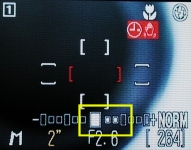
In the following images, aperture is set to F2.6. When the shutter speed is changed to 4 seconds, the left image below shows that the combination of F2.6 and 4 seconds is 1 stop below the "correct" exposure. In the right image, shutter speed is changed to 2 seconds, and the scale indicates that this combination is 2/3 stop higher than the "correct" exposure. With this knowledge, we can select aperture and/or shutter speed so that the deviation on the scale is as little as possible. Or, if a specific over- or under- exposure is required, we can fine tune aperture and shutter speed so that the desired exposure is shown on the scale.
|
|
|
| -2/3 stop | +1 stop |
The scale only shows +2 or -2 stops (or EV - see exposure value for a detailed discussion). If the current (aperture, shutter speed) combination is larger than +2 stop or smaller than -2 stop, the scale will not be able to show the differences. The exposure scale on the monitor only appears when turning the command dial and last for about 8 seconds and then disappears. You can press the shutter release button halfway down to get this scale back.
You can also use Exposure Compensation to increase or decrease exposure.
As discussed in Exposure Value: EV, when the shutter release button is pressed, the camera meter measures the illumination and determines an EV (i.e., exposure value). Under the manual exposure mode, a (aperture, shutter speed) combination may not produce the right amount of light that is required by the exposure meter. This means, the (aperture, shutter speed) combination is not on the desired EV line. This combination could be above or below the EV line. If it is above (resp., below), the (aperture, shutter speed) produces an under-exposed (resp., over-exposed) image as shown below.
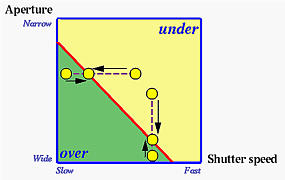
The scale on the LCD monitor tells us if the current (aperture, shutter speed) combination is just right, over- or under- the expected exposure value. Thus, turning the command dial adjusts the (aperture, shutter speed) combination closer to the EV line. It may take a number of adjustments. For example, if you choose an aperture and start to adjust the shutter speed, it is possible that none of the available shutter speed can cause the (aperture, shutter speed) to be on the EV line. Should this happen, you might want to fix an acceptable shutter speed and start to adjust aperture. After switching back and forth a couple of times, you may be able to bring the (aperture, shutter speed) combination very close to the EV line (i.e., to the desired exposure).