To enter the Aperture-Priority mode, press and hold the MODE button and at the same time turn the command dial:
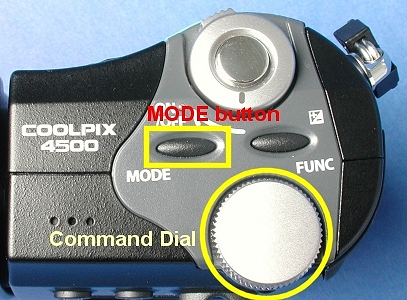
While the command dial is being turned, the letter in the lower-left corner of the LCD monitor changes. The possible letters are P, A, S and M for the program, aperture-priority, shutter-priority and manual exposure modes, respectively. Therefore, once A is shown on the monitor (see the next section), the camera is in the aperture-priority mode and you can release the MODE button.
When the camera is in the aperture-priority mode, turning the command dial selects an aperture. As the command dial is being turned, an aperture in the form of Fx.y appears on the LCD monitor. See the image below. Once the desired aperture appears, stop turning the command dial and the camera will use that aperture. The corresponding shutter speed also appears next to the aperture on the monitor so that you can determine if the aperture and shutter speed combination is an appropriate one. If the selected aperture may cause over- or under- exposure, the aperture on the monitor blinks when the shutter release button is pressed halfway down. Should this happen, select another aperture and try again. If you are satisfied with the combination, press the shutter release button to take a photo. Otherwise, turn the command dial again for a new aperture setting.
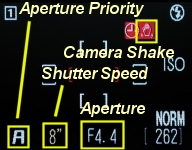
The command dial can be turned in either direction: clockwise for larger aperture (i.e., smaller Fx.y) and counter-clockwise for smaller aperture (i.e., larger Fx.y). If the displayed aperture does not change while the command dial is being turned, this means you have already reached the maximum or minimum aperture. Turning the command dial causes the aperture to change in an increment or decrement of 1/3 stop. Note that if the selected shutter speed is longer than or equal to 1/4 second, it is shown in yellow on the monitor to indicate that noise may appear in the recorded image. Moreover, if the shutter speed is slower than 1/30 sec, the Camera Shake icon(i.e., a red palm ), will appear in the upper-right corner of the monitor. See the image above.
You can also use Exposure Compensation to increase or decrease exposure.
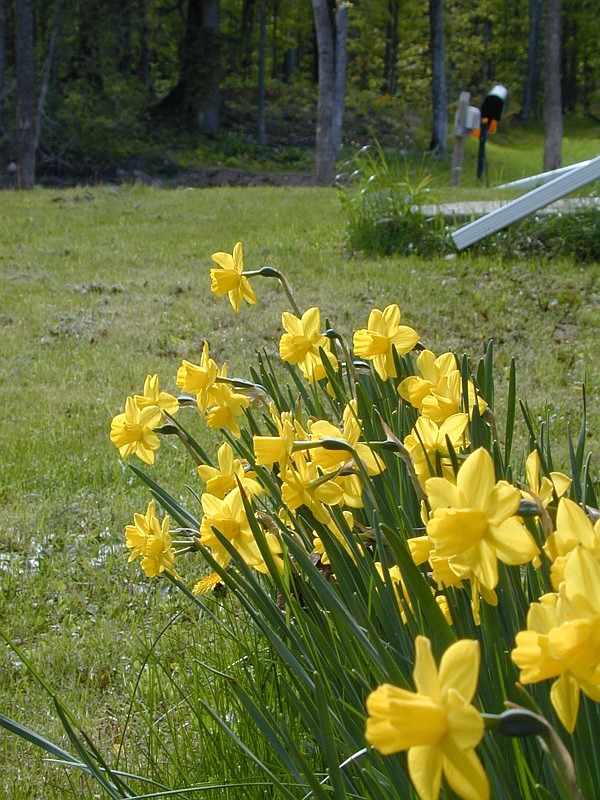
The use of aperture-priority mode is basically for controlling Depth of Field. The larger the aperture, the shallower the depth of field. A shallow depth of field makes the main subjects standing out. The following images were taken with a focal length of 115mm (35mm equivalent). The aperture used were F11.4, F6.8, and F4.0. The sharpness of the left image, from foreground to background, does not change very much. As the aperture becomes larger, foreground and background start to blur. In the right image below, which was taken using F4.0, the background becomes reasonably blurred so that the yellow flower in the middle is isolated from the background. Note also that the flowers in the foreground are also blurred. Therefore, when you need to isolate your subjects from the background/foreground, use a larger aperture.

|
|

|
| F11.4 | F6.8 | F4.0 |
| Click on the icon to see a larger image | ||
The following images show another example of the relationship between depth of field and aperture.

|

|

|
| F10.7 | F5.4 | F3.9 |
| Click on the icon to see a larger image | ||
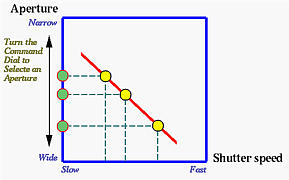
As discussed in Exposure Value: EV, when the shutter release button is pressed, the camera meter measures the incoming light and determines an EV (i.e., exposure value). In the aperture-priority mode, turning the command dial causes the aperture value to change, which, in turn, determines an appropriate shutter speed using the EV line found by the camera meter. This is shown in the figure below.