While in theory Coolpix 9xx, 4500 and 5000 can use ring flashes for close-up photographic work, in many situations the use of a ring flash is not entirely feasible. There are a number of reasons. However, three of them are worth mentioning. First, a ring flash may block the flash sensor. Second, since the Coolpix cameras do not use through-the-lens (i.e., TTL) flash metering, getting a well-exposed close-up using ring flash is not easy. Third, perhaps the worst, most ring flashes are designed for 35mm SLR cameras using micro/macro lenses. These lenses have a working distance around 15cm or larger, and the minimum power of a typical ring flash can only be achieved at about this distance. However, the Coolpix cameras can close focus down to 2cm. At this distance, the ring flash being used will not be able to reduce its power as instructed by the camera and over-exposed images are likely. We certainly can use neutral density filters to reduce light intensity; but, it is quite tedious. For those who do close-up photography frequently and feel that ring flashes may be too strong, Nikon's Cool Light SL-1 ring light may provide a solution. However, the intensity of SL-1 is quite low. If this is your concern, the Samigon Halo-Light FRL-1 may be a possible solution.
The FRL-1 package comes with a fluorescent ring light tube, a power pack, a snoot, and three step rings of 49mm, 52mm and 55mm with the 52mm one on the ring tube. An AC power adapter is not included and must be purchased separately. Similar to Nikon's Cool Light SL-1, the FRL-1 is also a continuous light rather than a flash light. This means it is on continuously until its power is turned off. Unlike the SL-1 which uses eight small LED's, the FRL-1 uses one circular fluorescent ring tube with approximately 1/6 of the ring tube covered (i.e., does not emit light).
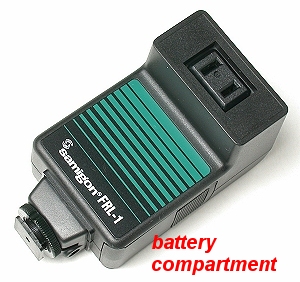
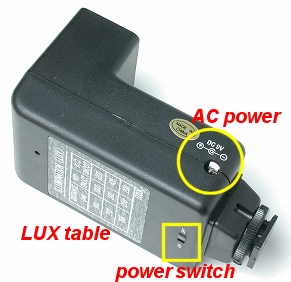
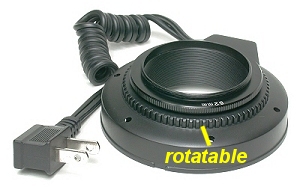
The images below show the power pack of the FRL-1. As shown in the left image, the right side has the battery compartment that holds six AA batteries. On the other side of the power pack, we see an AC power plug that is to be used with FRL-1's AC power adapter. The back panel has a power on/off switch and a LUX table. The power pack also has a cold-shoe (i.e., has no contact) to be mounted in the hotshoe of a camera or a bracket.
|
|
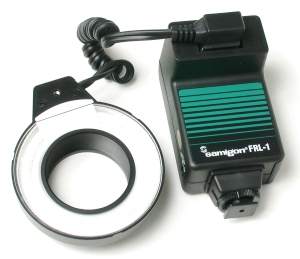
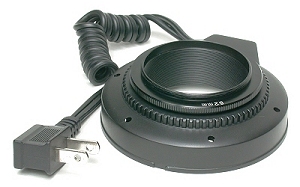
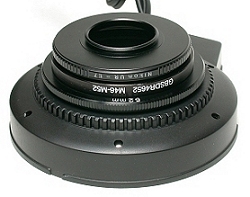
Plugging the ring light cable into the power pack and inserting batteries, the FRL-1 is ready to use. See the left image below. The FRL-1 package also include three step rings of size 49mm, 52mm and 55mm, with the 52mm one mounted on the ring light tube as shown in the right image below.
|
|
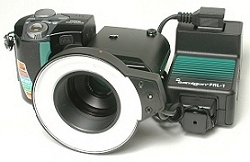
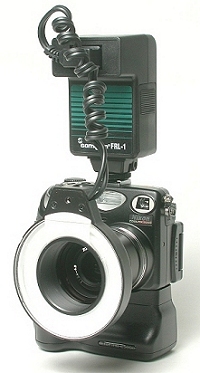
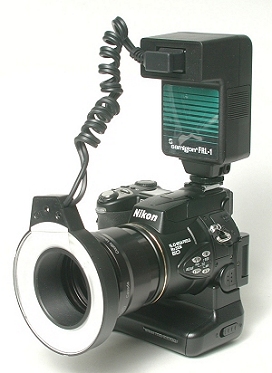
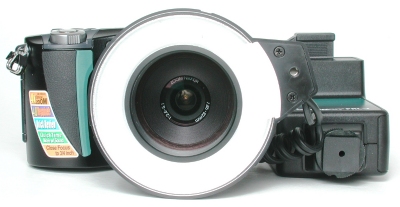
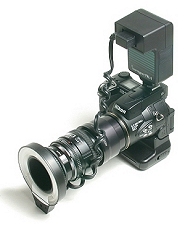
The following images show the FRL-1 with 4500 (left), 5000 (middle) and 5700 (right). Note that since the step ring sizes are 49mm, 52mm and 55mm, none of these rings can be used to mount the right tube onto the camera. For 950/990/995/4500 users, a 28mm-52mm step-up ring is needed (if you could find one). Otherwise, one can use Nikon's UR-E7 28-46mm step-up ring, followed by a 46-49mm or 46-52mm step-up ring. See the second image on the first column. Coolpix 5000 users will need Nikon's UR-E5 adapter to provide a 46mm thread, followed by a 46-49mm or 46-52mm step-up ring. Coolpix 5700 users have more options. The right image below shows the use of NextPhoto Coolfix adapter, followed by a 62-52mm step-down ring. After mount the ring tube onto the camera, it can be rotated to an orientation suitable to your shooting situation. However, since light tube only covers 5/6 of a complete circle, some portion of the scene may not be evenly illuminated when the subject-camera distance is very short.
|
|
|
|
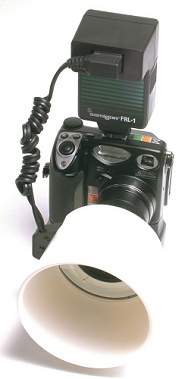
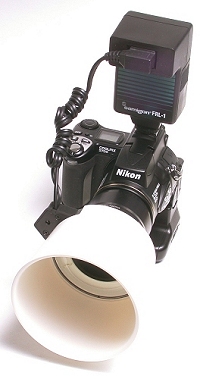
One can screw the supplied snoot onto the ring tube to increase the intensity of illumination. The following shows the snoot mounted on different cameras. As you can see, the snoot is quite big compared with the size of a 4500.

|
|
|
What is the difference with and without the snoot? I did a not-so-scientific measurement. I place the SL-1, FRL-1 without snoot, and FRL-1 with snoot in a dark room and use an incident light meter to measure the EV of each setup. I found that the FRL-1 has a higher intensity than that of the SL-1. For example, the FRL-1 with the snoot is about 3 EV brighter than that of the Nikon SL-1. See the table below. This means that if the aperture and shutter speed are F2.8 and 1/4 sec with Nikon's SL-1, then we could use either F8.0 and 1/4 sec or F2.8 and 1/32 sec with the FRL-1 plus the snoot. In this way, we can use a smaller aperture for a larger depth of field, or a faster shutter speed to minimize the influence of camera movement. This is important because people who felt the SL-1 being too weak now have a better choice (i.e. about three stops difference).
| Equipment | at 10cm | at 20cm |
| Nikon SL-1 | 7 plus 2/3 EV | 5 plus 2/3 EV |
| Samigon FRL-1 without snoot | 8 plus 2/3 EV | 6 plus 2/3 EV |
| Samigon FRL-1 with snoot | 10 plus 2/3 EV | 9 plus 2/3 EV |
The use of FRL-1 is exactly identical to that of the Nikon SL-1. Please refer to the Nikon Cool Light SL-1 page for the details. Are there any difficulties in using this FRL-1? Yes, there are! The 950/990/995/4500 users may have a problem. Since the FRL-1 without 28-52 step-up rings is about 8mm thicker than that of the Nikon SL-1, it is unlikely that we can use the FRL-1 at the 2cm minimum focus distance. Moreover, the Nikon SL-1 has its eight LED lights recessed somewhat so that when the SL-1 is placed on a flat surface, it still can illuminate the subject. On the other hand, the surface of the FRL-1 ring tube is completely flat. Thus, if it is placed on a flat surface, it cannot illuminate the scene properly. The following image shows how deep the lens is from the front surface of the FRL-1. Users of 5000 and 5700 may have the same problem; however, 5700 users may have a very good solution. If the 5700 is set to its maximum focal length with a Nikon #6T close-up lens (+2.9 diopter), the magnification is slightly better than that of the 5700 macro mode and the minimum working distance is about 16cm, which is much larger than the minimum focus distance in the macro mode. In this case, the use of a snoot may be needed to increase light intensity.
| The first thing I like most is FRL-1's power. With the snoot mounted, one can easily move the camera to a distance about 15cm and still maintain an aperture about F7.x and shutter speed of 1/15 to 1/30 sec in a not so well-illuminated environment. Many users who dislike the low power of the SL-1 may feel happier with this FRL-1. Moreover, the translucent snoot may serve as a spotlight shedding light to a specific area. |

|
| Second, since the thread size includes all common ones (i.e., 49mm, 52mm and 55mm), the FRL-1 can be used with virtually all digital and film cameras. I tried FRL-1 on my Micro Nikkor AF 60mm F2.8D lens with a 62-52mm step-down ring, and found no vignetting. On the other hand, the Nikon SL-1 can only be used with 950/990/995/4500 and 5000 (with UR-E6). |
Third, the supplied snoot is very useful. As mentioned above, the snoot can concentrate the light a little so that the subject-light distance can be larger. In fact, the snoot can also soften the light. In the following, images on the first (resp., second) column were taken using a 4500 without (resp., with) the use of the supplied snoot. As you can see, the images taken with the snoot are not so harsh and have a little lower contrast. The shadows tell the story.

|

|
|

|

|
Fourth, this FRL-1 can easily be used off camera and provide a better off-camera illumination capability than the Nikon SL-1 can. The effect may even be better with the snoot because the light is "softer." The following images show the use of FRL-1 off camera.

|
|
|
Fifth, the optional AC adapter is very useful, although somewhat inconvenient. Since I normally shoot continuously for a long time, using batteries may be too inconvenient for me. This optional AC adapter allows me to forget if batteries are weak. However, the use of an optional AC adapter is somewhat inconvenient. The power cable plugs into the power pack. This means I need to watch two cables, one from the AC adapter to the power pack and the other from the power pack to the ring tube. If I am not careful enough, one or both could sweep my subjects off their positions. The Nikon SL-1's way is more preferable. More precisely, I wish the ring tube could have a connector for either the AC-adapter or power pack. In this way, I don't have to be worrying about the power pack when the AC adapter is being used. This is my personal preference, though. You may have a different opinion.
First, what I dislike the most is the design of the ring tube. With a 5000 or 5700, the power pack can be mounted in the hotshoe. A 950/990/995/4500 user may not be so lucky. The large power pack is very annoying because you don't know where to put it. It is especially true if you happen to use an AC adapter. The ring attached to the ring tube is rotatable, but is very stiff. See the image below. Therefore, it is likely that the step ring will rotate and fall off when screwing the ring tube on or off the lens. Moreover, because there is a cable connecting to the power pack which is supposed to be mounted in the hotshoe, mounting and demounting the ring tube is very tedious. For most of the time, I ended up rotating the camera to mount or demount the ring tube.
Second, the ring on the right tube is even more troublesome when using a longer lens. The left image below shows a reversely mounted Nikon AF 50mm F1.8 lens on the 5700. Because the ring is rotatable and the supplied cable is not long enough, the orientation of the ring could change suddenly due to the tension applied to the cable. But, what is wrong with this? See below.
|

|
Third, when the ring light is close to the subject, since about 1/6 of the ring is covered and does not illuminate the scene, we shall have an un-even illumination. The right image above was take in the 5700 macro mode. The 1/6 portion that does not emit light is located in the upper right corner. As you can see, the illumination is not even. This situation could be worse if a long lens is used as shown above. The tension of the cable can suddenly change the position of this portion to an un-wanted orientation. In my opinion, a switch might be necessary to fix this problem, and the cable could be a little longer. Note that when the distance between the light and subject is larger, this problem disappears automatically.
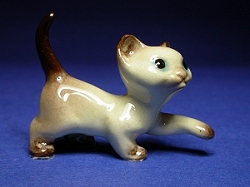
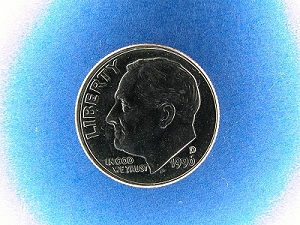
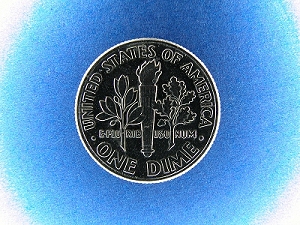
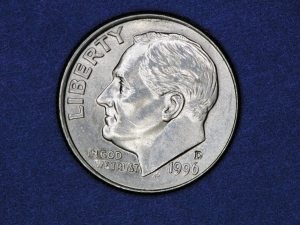
Fourth, as mentioned earlier, the surface of the ring tube is flat. This makes extremely close-up very difficult. The two images on the top row below, which were taken using a 5700 with the FRL-1 placed on the blue background paper, show the problem. It is obvious that the effect is not as good as those obtained with Nikon's SL-1. Side-light which leaks from the border of the ring tube is strong and the top portion of the coin is not illuminated sufficiently. On the other hand, the two images on the second row are much better. These two images were taken with a Nikon #6T close-up lens and the snoot mounted on the FRL-1. The background is considerably under-exposed because metering is based on the coin; however, this under-exposed background makes the coin standing out. Let us compare the shadow differences. Images on the top row has highlight around a feature because the light comes from two sides, while images on the bottom rows show darker silhouette around each feature because light comes from the top! Because the snoot also diffuses the light somewhat, the illumination is quite even and each feature stands out vividly.
|
|
|
|

|
Fifth, as everyone knows, a reflective subject will reflect the shape of the light source, especially when the light source is close to the subject. It is not a particular problem of the FRL-1. It is a universal problem that all light sources share, ring flashes included. The images below show that whether a snoot is used (below right) or not the reflection is there! As a result, avoid shedding light directly onto a reflective subject. Some may suggest the use of a polarizer. Unfortunately, it does not always work for two good reasons. First, to remove reflection, the light source and camera must satisfy some relationship. Click here to see the details. However, this does not apply to the situation in which the light source direction and the viewing direction are the same. Second, even though one might use the FRL-1 off camera, a polarizer only works fine with non-metallic subjects!

|

|
Sixth, although this ring light uses a cold cathode fluorescent lamp, it does generate heat. Although it is not as hot as a regular lamp, the heat generated by FRL-1 is higher than that of the Nikon SL-1. However, this heat problem does not do any harm because one still can hand hold it even after a 30-minute continuous use.
The FRL-1 is a very useful tool and has freed me from using a ring flash for many shooting occasions in spite of some dislikes reported above. Here is a list of my very personal findings:
The following two tables are taken from FRL-1's data sheet.
| Light Source | Cold Cathode Fluorescent Lamp (CCFL) |
| Color Temperature | 5000 K +/- 10% |
| Power Source | 6 1.5V AA batteries or 9V 600mA AC/DC adapter |
| Dimension | Ring Light: 90 (diameter) × 26mm Power Pack: 115 × 62 × 58mm |
| Weight | Ring Light: 83g Power Pack: 103g (without batteries) |
| |
Distance from Halo-Light | |||
| 100mm | 200mm | 300mm | ||
|
Approximate Illumination (LUX) |
with snoot | 1800 | 500 | 250 |
| with snoot | 1200 | 400 | 200 | |